Running CMC
Here we describe how to actually run CMC, assuming you’ve generated the initial conditions using COSMIC
Running CMC
With our initial conditions in place, the hard part is actually over! Assuming
the cmc executable is the directory you want to run from, we need only to
call it with mpirun (or mpiexec, depending on your mpi version):
mpirun -np <n_cores> ./cmc <params.ini> <output>
Where
<n_cores> is the number of cores you want to run on
<params.ini> is the path to your .ini file (examples here or in the Configuration files for CMC page)
<output> is the prefix for all the output files that will be produced by CMC
Restarting CMC
CMC allows for bit-for-bit restarting, by saving the state of each parallel
process every few hours (2 by default). These restart files will be saved in
your run folder in a subfolder titled <output>-RESTART. These restart
files will be numbered sequentially starting from 1, so you’ll have to specifiy
which restart
file you want to use. A typical restart file will have the form
<output>.restart.<n>-<proc>.bin, where <n> is the number of the
restart, and <proc> is the number of the mpi processor that file was
produced by.
To restart CMC from one of these, you’ll need the original .ini file and the path to the restart folder.
mpirun -np <n_cores> ./cmc -R <n> <params.ini> <new_output> <output>
where <new_output> is the new prefix for all the files that are restarted. If
for some reason you need to start from a restart file but with a different
random seed, you can specifiy that on the command line with -n <new_seed>
Note
CMC cannot restart on different numbers of cores than the original run was performed on
Example: Run Plummer Sphere to Core Collapse
Now we have all the tools we need to run CMC! Let’s try running the above Plummer sphere with \(N=10^4\) particles to core collapse.
We’ve already generated the initial conditions above and saved them as
plummer.hdf5, so all we need is to move them into a folder with the cmc
executable and an appropriate ini file. We can use the PlummerSphere.ini
file located in the CMC-COSMIC/examples
folder.
With that in place, we can run CMC on four cores with
mpirun -np 4 ./cmc PlummerSphere.ini plummer
On the Vera cluster at CMU, this takes about 2 minutes to run to core collapse.
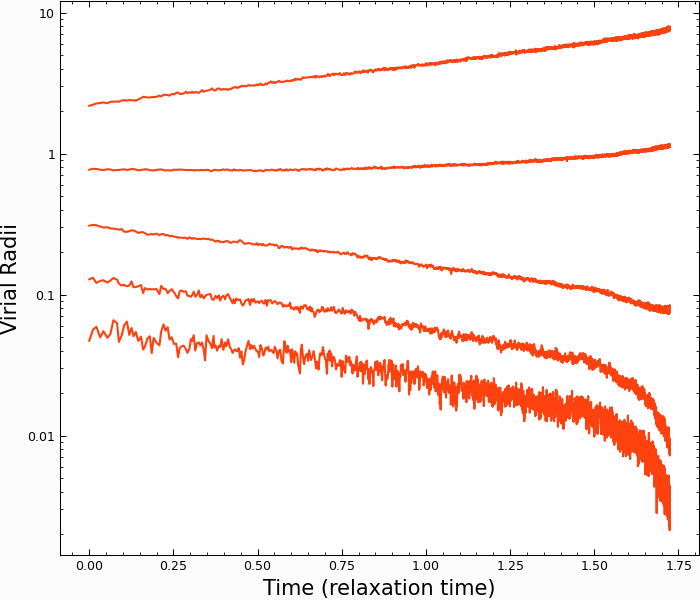
We can check that it’s worked by looking at the Lagrange Radii (the <x> Lagrange radius is the radius enclosing <x> percent of the cluter mass). If we plot the 0.1% 1%, 10% 50%, and 90% Lagrange radii, the classic collapse of the core (and expansion of the halo) appears:
In [1]: import pandas as pd

In [2]: lag_rad = pd.read_table('source/example_output/plummer.lagrad.dat',header=1,delimiter=' ',index_col=False)

In [3]: plt.plot(lag_rad['#1:t'],lag_rad[['7:r(0.001)','12:r(0.01)','17:r(0.1)','21:r(0.5)','25:r(0.9)']],color='C1');

In [4]: plt.yscale('log');

In [5]: plt.xlabel("Time (relaxation time)",fontsize=15);

In [6]: plt.ylabel("Virial Radii",fontsize=15);